You shouldn't move on to this guide unless you have a good understanding of the basics.
There will be comments from me throughout Stava's image-based guides to explain or add to what hes doing.
I did not create and do not own this guide. It is the sole property of Stava.
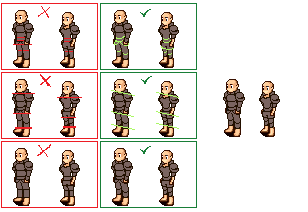
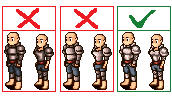
Stava expands on the basic isometric that Roefl taught in his guide. These are examples of some classic mistakes that new pixel artists make, followed by correct examples.
First row: Shapes
Second row: Angles
Third row: Outline
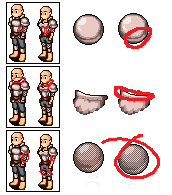
Baggy clothing is slighty different in isometric, due to the flowing and sometimes irregular nature of the material. Metal plate is hard and precise, adhering to the body. Cloth is the opposite, it flows and hangs from the body.
Remember that at the base of all EO-style artwork is a good isometric outline. It's important to get it right.
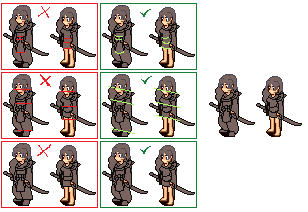
When in doubt, use guidelines. If the figure does not generally follow isometric lines, then it's not isometric.
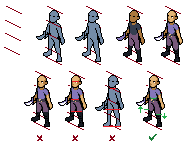
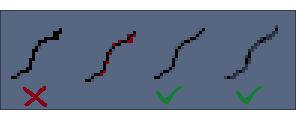
Beginning a pixel art piece isn't always a precise process. If you look at this picture you see that Stava first creates a general outline or shape, and then cleans it up as he goes. The pixels being removed or cleaned up are highlighted in red for the purposes of this guide.
We'll go closer up on this one to see what Stava is doing in detail. This is an introduction to Antialising [AA.]
Antialiasing is the smoothing of jagged lines by placing transitional colors along and sometimes on the outline. In his example, Stava antialiased the line into the blue background with dark blue-grey pixels.
It's important not to overuse AA, as that will result in blurry rather than smooth lines. Use as much as you think is necessary; no more, no less.
Just look at how much AA can soften the overall features of your piece! It can give your art a much more realistic appearance than a solid, jagged line.
You may have noticed that Stava used AA on both sides of the outline, blending into the background as well as the inner shading. In Endless Online style pixel art, there can only be inner AA, because the background is not static. These aren't isometric, but they are examples of the type of inner Antialiasing that should be used.
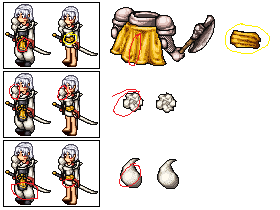
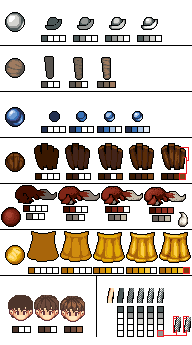
For the purposes of this guide, the color being used is displayed above each frame.
Look at the progression of the shading: Stava starts with the darkest color and progresses to the lighter colors. It's a very clean way to shade.
When you're trying to portray a softer material like cloth or fur, shading style goes a long way. Contrast is key! Pick the shades/luminosity of colors carefully.
Different materials are shaded differently, with contrast and highlights varying based on material. In this case, there is far less contrast between the shades of the fur/cloth than in the metal plate above.
Remember to always envision the sprite as a 3d figure; this is as much a shading lesson as it was an outlining one. Consider how the light would interact with the different materials if the sprite were real. A good example of this is the metal plate covering the abdomen of the male.
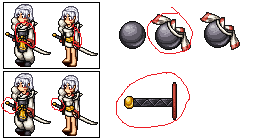
Notice the antialiasing added on the sleeve between the red and white fabric. Also, take a look at way Stava treats different colors on the same piece of cloth; see how the hightlights and shadows remain consistent?
In my experience I've found that one of the important things to do with hair is making it more subdued than the rest of the piece. Notice that the outline of the hair is not as dark as the armor, which contributes to the subdued and less cartoony look that hair should have.

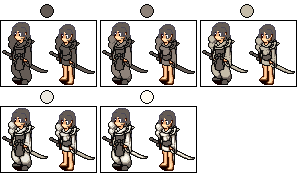
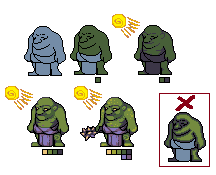
What's wrong with these? You can hopefully see that the example on the left is pillow shaded. (Which Roefl warned you about!)
The middle example looks flat and isn't shaded or highlighted properly to look 3D.
Look at the last, correct example. Try to see how Stava accomplishes the 3D appearance with his shading style.
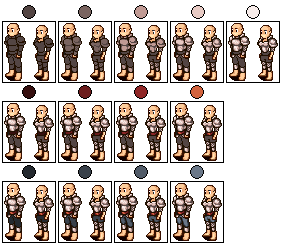
Look at the placement of the highlights circled in the first row. In Stava's style this is very effective for giving a shiny 3D metal look.
Metal is a very contrasting material, with darker shadows and bigger highlights than other materials.
You'll see at the bottom that checkering is the only practical way to make chainmail on an EO sprite.
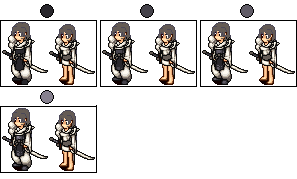
Stava outdid himself on the first cloth example, you can really see how he handles the folds of cloth and how it relates to the smaller sprite. To do it realistically, the folds should be dark enough to notice, but not too light as to not look like folds. Dithering might be a good choice here.
Like with any material, there are many variations of metals. If you compare the dark metal sphere to the light metal sphere example from the first armor, you'll see that it's a more rugged, less shiny metal.
Compare and contrast them. What's different? What's the same for all types of this material?
Several basic textures with examples. Note the differences between materials like the plate and the fur.
- Plate
- Cloth
- Crystal
- Wood
- Fur
- Leather
- Hair
- Chainmail
Dithering can be used in a multitude of situations. These are all examples of dithering. It's typically a purely stylistic choice, and is also used to reduce the amount of colors in a piece.
Excessive dithering can create a checkered, unappealing appearance
to your pixel art, so use it sparingly.
It's important to honor the upper-left light source, but that doesn't mean all highlights must be concentrated on the left, and all shadows must be concentrated on the right.
In fact, if you want to create a 3D-looking figure, you usually don't want to do that.
There should be more highlights towards the light source, and more shadows away from it. That is the only real rule for isometric lighting.
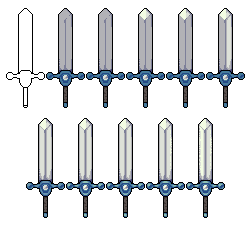
Look familiar? Think about the differing ways that Stava and Roefl make swords. Remember: There's no one right style for creating pixel art! Consider their personal stylistic choices.
Now take a closer look at Stava's sword. Do you recognize all the different materials?
Consider the function of the light dithering at the base and along the edge of the blade.
Hopefully, the Basic and Advanced guides have given you an understanding of Endless Online pixel art and set you on your way to developing your own individual pixeling style.
The Application guide will teach you some more technical lessons about creating each type of EO item. Good luck!
-Cirras